


char pmslink – vendors training
1. Basic concepts
pmslink is an application designed for simplyfing the integrations between any PBX, HotSpot, IPTV, Keycard, Domotic or GuestApp system with any PMS system (Property Management System), in any kind of architecture monohotel or complex multihotel with multiple PMS systems and external ones facilitating the integration between them.
pmslink acts as a middleware between systems contributing to the connection´s security and control, powering the performance of each equipment and/or integrated system and enabling the integration through multiple devices in formats and adaptable protocols and each manufacturer´s owner, simplifying the integration between equipments.
pmslink provides an intelligent middleware that not only translates the protocols, but also controls the connections as a buffer when needed, so that by isolating the activity of each integrated device/equipment, it controls its activity in order to obtain a system even more resilient to the usual integrations problems.
2. General concepts
Basic architecture

Basic connection diagram
The next diagram represents a basic connection in a typical environment where pmslink is installed.

Devices connection
pmslink application must be configured to be connected to the following systems:
- Communication device, communication systems basicaly (switchboard, PPV system, web server, …) called Device in pmslink.
- PMS device: Hotel management application or PMS (PMS -Proprietary Management System-, …), called PMS in pmslink.
Link integration Device
pmslink facilitates multiple communication systems like PBX, TV system, Internet system, etc. simultaneously.
By default, this application has a license to be connected to one (1) communication system and one (1) PMS system. In case more than one communication system is required / PMS connection, the application must be properly licensed. To do this, contact our sales team in sales@char.es to update the license if necessary.
In an usual environment, we will find a PBX and a PMS connected to pmslink.
The device in connection with the PBX used for:
- Receive telephone traffic data and/or Room/ Minibar status code from the PBX: pmslink will process the information and send the prices of calls to the external application (PMS) using the defined protocol. Depending on the customer requirements, you can also send the information of the room status and the minibar.
- Sending commands (Check-In, Check-Out, Reminders, …) to the PBX that were received
from the external application external application (PMS).
As the application license is also limited to the number of extensions, it is mandatory to configure the used ones.
PMS integration link
pmslink facilitates the connection of multiple external applications (PMS) simultaneously.
By default, the application is licensed to connect with a PMS system. If integration with more than one external application (PMS) is required, the application must be properly licensed. To do this, contact our sales team at sales@char.es to update if necessary.
In an usual environment, we will find a PBX and a PMS connected to PMSLINK.
The PMS connection link is used for:
- Sending telephone charges with calculated amount to the PMS application using the specific protocol of the PMS itself.
- Reporting room cleaning status changes reported from PBX, Minibar charges, plus programmed desperation results (if these messages and activities are supported by PBX and/or PMS).
- Receiving orders from the PMS to be sent to the PBX as Check-In, Check-Out, Wake up, Room Change,
2. PMSLINK service
pmslink is a Windows application, displayed by default in c:\charwin\ and installed as a Service that we will find in Windows services with the service name ‘PMSLINKService’ and display name ‘utile PMS link’
pmslink must always be configured with automatic startup to solve situations in which the PC is restarted or a maintenance stop is performed by IT personnel that support the PC.
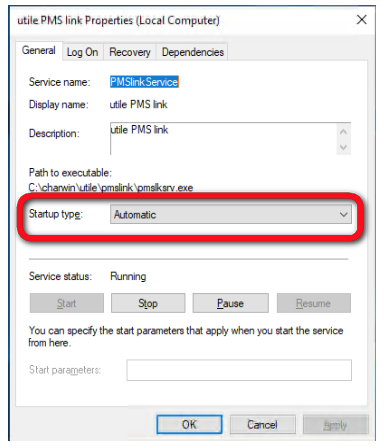
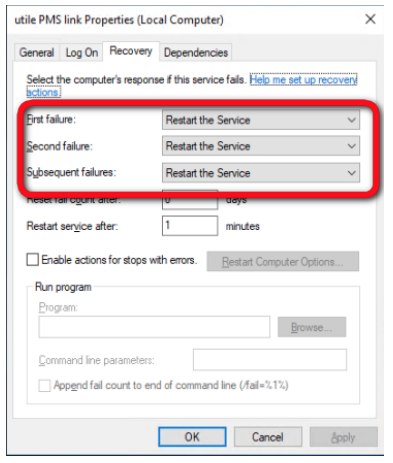
It´s also recommendable to configure in recovery the PMSLINK restart in error cases.
PMSLINK installation process
The application installation process includes the installation of the product on the PC or server, the licensing of the product (virtually), the configuration of connections (devices and PMS) and the basic check of the correct operation of the application.
System requirements
| Minimum | Recommended | |
| CPU | 2 Ghz Intel® Pentium/Celeron o CPU compatible | 2 Ghz Dual Core or higher |
| RAM | 1GB | 2 GB |
| OS | Any current version of Windows | Any current version of Windows |
| HDD | 5GB free | 10 GB or more free |
| Ports | Dependent on communication with PMS and PBX | Dependent on communication with PMS and PBX |
| LAN | LAN connection to reach the equipment to be integrated | |
| Others | Internet access (to facilitate remote support access as well as online license activation) *In case you do not have Internet access, the license can be activated by email | Internet access (to facilitate remote support access as well as online license activation) *In case you do not have Internet access, the license can be activated by email |
Pre-installation checklist
PMSLINK installer
http://www.chardesarrollodesistemas.com/download/lic/utile/installer/pmslink/pmslink_installer.exe
System requirements
- PC/Server complies with the requirements of the previous point “system requirements”
- Review and correct the PC date and time if necessary
- Disable if applies the User Account Control (UCA) service to the Windows system on which it is deployed
- Disable if applies the Data Execution Prevention (DEP) service to the Windows system on which it is deployed
- Antivirus: configure for the exclusion of the scan and protection on the directory C: CHARWIN, as well as the executables contained in it. Firewall: allow connections from/to pmslink
- Confirm that you have Administrator permissions to perform the installation
PBX requirements
- Confirm that the relevant licenses (if required by the manufacturer) are active
- Review and correct if necessary the date and time
- Identify the languages installed and available on the computer
- Identify configured OCs or external line access permissions
- Confirm availability and access to the connection medium arranged to integrate with the equipment (see technical notes associated with each equipment)
PMS requirements
- Confirm that the relevant licenses (if required by the manufacturer) are active
- Identify the languages installed and available on the computer
- Identify configured OCs or external line access permissions
- Confirm availability and access to the connection medium arranged to integrate with the equipment (see technical notes associated with each equipment)
Installing PMSLINK
pmslink installation is an easy and intuitive process in which you just need to specify the general parameters for your installation:
- Execute setup.exe.
- Accept license terms and agreement
- Installation path: The application is installed in the default folder .. charwin
(recommended), but you can select any other location.
Proceed to the installation of the application, the installer may ask to restart the PC.
Modifications made to the system:
- Creating the installation directory (‘Charwin’).
- Creation of the general configuration file called charsys.ini in \Nwindows.
- Installation of the “PMSlinkService” service (pmslksrv.exe) as “utile PMS link”.
- Record the file association *.dff with the flowview.exe. application (Traces).
- Creation of a shortcut in the startup programs to the service interface (pmslkmtr.exe).
Application first execution
Once the PMSLINK application is installed, it will be accessed through the PMSLINK Monitor
that we locate in:
Windows ‘Start’ menu \All programs\cHar PMS link\PMS link Monitor.
Important: The password to access pmslink is master
License activation
License activation can be done automatically online or manually via request to the Char Support team.
Automatic activation of the virtual license
Follow the instructions below:
- Start the PMSLINK Monitor (Windows ‘Start’ menu\All programs\cHar PMS link\
PMS link Monitor) - Access the menu PMS Link\License activation and enter the license number
provided by sales@admin5350
- Select ‘Activate license for this computer’ and ‘Throught internet’
Manual activation of the virtual license
Follow the instructions below:
- Start the pmslink Monitor (Windows ‘Start’ menu\ ‘All programs’\ ‘cHar PMS
link’\ ‘PMS link Monitor’) - Access the menu PMS Link’\ ‘ License activation’ and enter the license number
provided by sales@char.es
- Select ‘Activate license for this computer’ and ‘A telephone call or send email’
- Contact char Support to provide the activation code to register the product. In the
contact with Support char, please provide the following information:- License number
- Installation code
- Once obtained the activation key, enter it in ‘ Activation Key’ and press ‘ Activate’
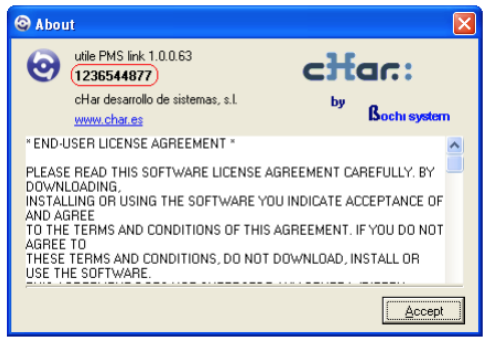
License verification
Access the PMLINK Monitor (Windows Start Menu ‘All programs’\ ‘cHar PMS link’\ ‘PMS link Monitor) menu ‘ Help’ ‘About utile PMSLINK’.
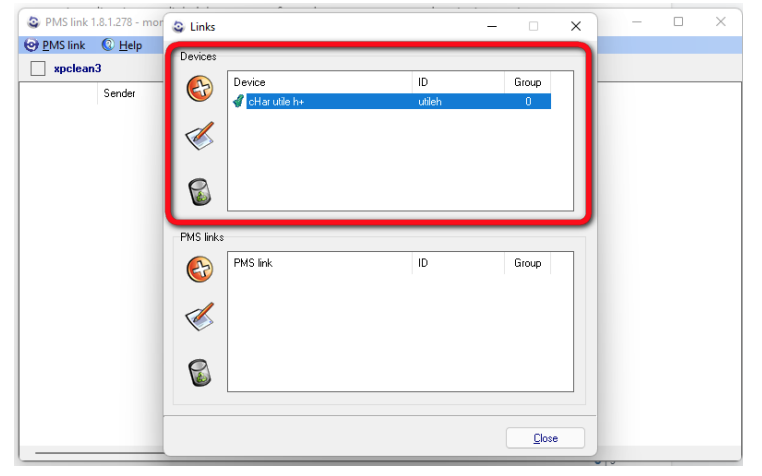
Configuring CNX PBX device (general concepts)
Devices
To integrate with PBX, follow these steps:
- Go to ‘ Monitor pmslink’\ ‘ PMS Link’\ ‘ Links
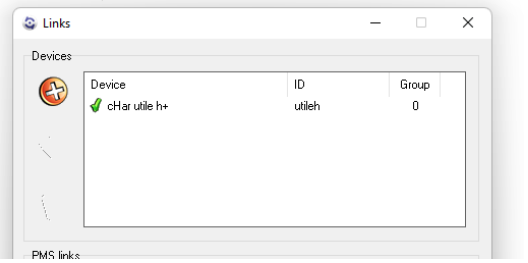
- Add a device from the ” +’ button to see the list of available equipment
- Locate on the list of available devices, the computer you want to integrate
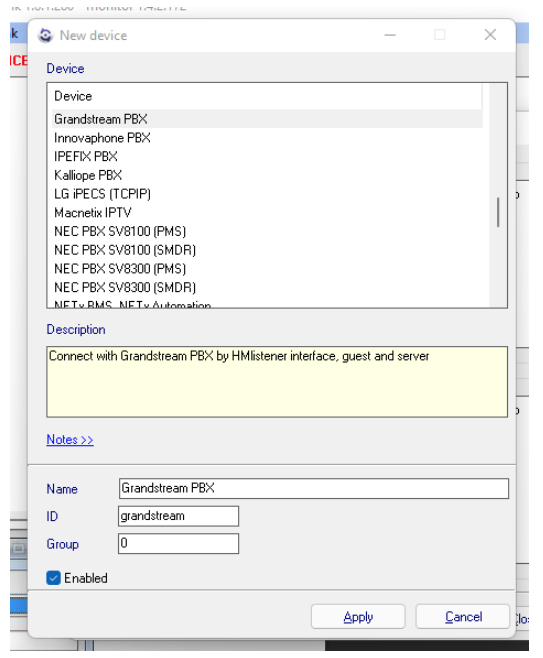
- Click on Notes’ to get the details and features of the integration with the selected equipment as well as relevant information about licenses or previous configurations to perform on the PBX equipment.
- Press ‘Apply’ to deploy integration driver in PMSLINK
Setup device
After selecting the device (previous section) and reviewing the settings indicated in the
associated notes with the device, proceed to configure it by following these steps:
- Go to ‘Monitor PMSLINK’ \ ‘PMS Link’ \ ‘Links’
- Double click on the device you want to set up
- The device configuration window will be presented (distribution and options may change depending on the selected device)
- Refer to the associated document PMSLINK device settings for… ‘ we provide you along with this guide to see the details and steps in configuring your equipment

Directory and extensions/rooms
Because the application license is also limited to the number of extensions to control, it´s mandatory to configure the extensions used in the PMSLINK application. The different departments of the organization must be configured with their respective extensions.
In a standard installation, the most common departments are
- Administration
- Guests
- Call boxes
How to create/add departments
- Select ‘ Organization’> ‘
- Click on ‘Add” to create a new department
- The next window will be displayed
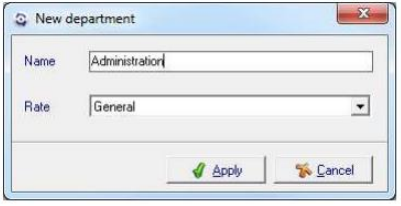
- Name: Name of department to create (for example: Administrationstaff, Guest or Callbox)
- Rate: Rate to be applied to the department. See prices for more details.
- Apply changes to register the new Department
- Repeat steps to create next departments
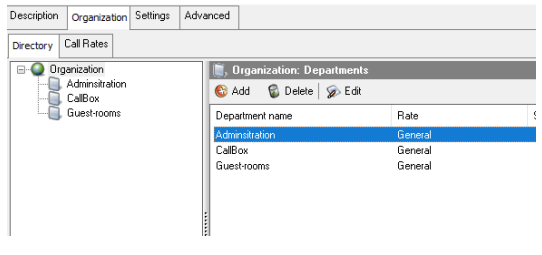
Once all departments are configured, you can edit or delete them through the buttons to that
effect.
How to create/add extensions-rooms
- Select ‘Organization’ > ‘Directory’
- Select the department on which to create extensions/rooms
- Press ‘Add’
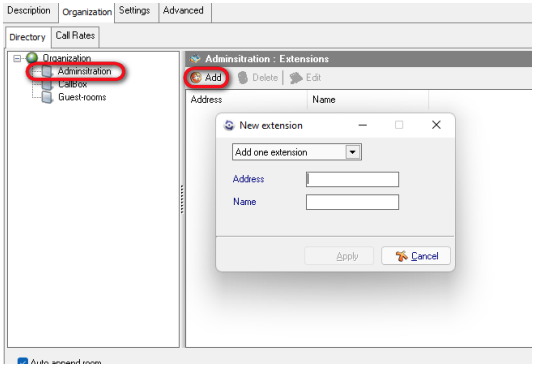
- Select Add an extension’ drop-down to register a single room
- Select “add range” to register a consecutive list of extensions from-to, to create extensions.
- Note that the difference between Address’ and Name’ in the creation of rooms.
- Address: responds to the telephone extension in the switchboard
- Name: responds to the room number as understood by the hotel staff and refers to the same PMS.
- For example: Room 101 has the telephone extension 1101, the setting would be: Address: 1101 y Name: 101
Repeat the process of creating rooms for each of the departments in which we want to
organize the extensions.
Typical setting example:
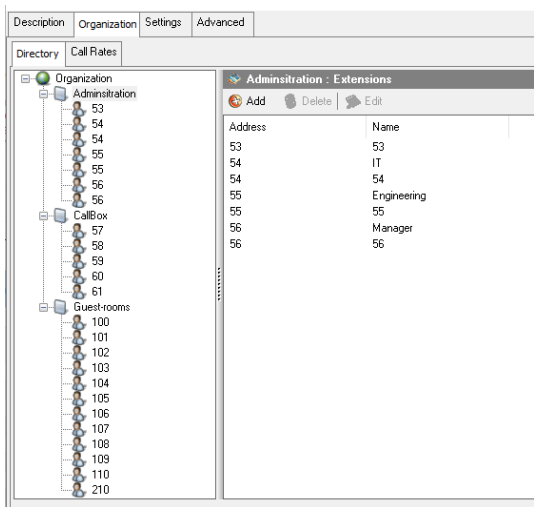
Once the rooms/extensions are created, it is possible to edit and/or delete them through the buttons arranged for that purpose.
Rates
We will show you how to create, delete or modify call prices for call charging below:
Note: Depending on the country where the application is installed, it may be necessary to create all the call price tables for the correct charging of them.
How to create rates
pmslink delivers a ‘Dummy’ rate called ‘Gerneral’ by default.
Once the rate has been selected, it is presented in the 3 Tabs view to modify the 3 parameters of it:
- General
- Rates
- Destinations
I. General Tab
This section defines the basic fare parameters.

Important: It is possible to create different rate types to assign to each department.
For example, you can create a standard rate (General) to assign to the “Administrative” department and then create another Rate (called ‘Hotel Rates’) to be assigned to the “Guests” and “Phone Booths” departments using the desired increments for each type of call.
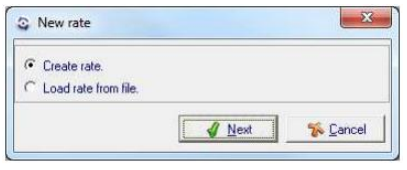
Create/modify rates
To create a rate press ‘Add’ button.
| Type of meter / Type of rate | |
| Process meter pulses | * Allows you to enable/disable the ability to process the steps (pulses) sent by the PBX. * In case the steps are not available, the call charging will be done by duration. |
| Meter pulse unit cost | Price of the pulse for calls rate |
| Calculate meter | * Allows to enable/disable the calculation of received steps. * This option is used to take into account the steps received, regardless if the call charging is done by steps or duration. * In case of analog lines, it is useful to charge only when a connection has been established. |
| Process meter pulse as connect flag | * Allows to enable/disable the step process as call setting. * This option is used to determine whether the call has been connected or not. * In the case of analog lines, it is impossible to determine whether the connection has been made (answered by the other party) so pmslink receives steps, it will mean that the communication has been established. * However, call charging shall be based on the duration. |
| Delay to start calculation (sec) | * Seconds that will not be taken into account to calculate the total duration of the call. |
Press Apply to save changes.
Upload rate from file
In some cases, it may be interesting or necessary to load a previously created rate into another facility to make it easier not to re-enter the data.
- To load a new rate press ‘Add’ button.
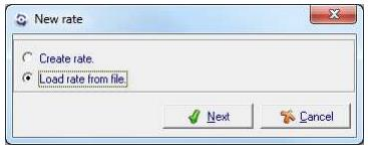
- Select ‘load rate form file’
- Use ‘Explore’ to locate the “*.rat” file to import
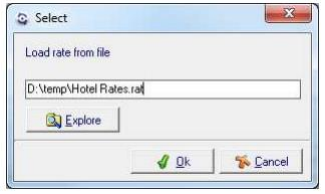
- Press ‘Ok’ para to import the new rate. Once loaded you can see it in the tariff panel.
II. Tab Rates
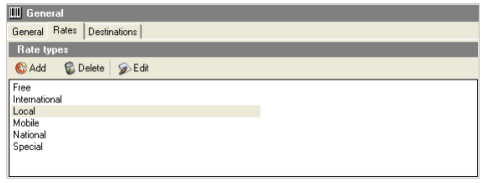
This section allows you to define the different rates that will be applied for each destination (number dialed) on each rate previously created (see section ‘How to create/modify rates’). Normally the basic rates to be created for each Operator (Rate) created are:
- Local
- National
- Mobile
- Special
- Libres
- Internationals
How to create/modify rates
To create a rate, press ‘Add’ in ‘Rate types’ and set the name of it.
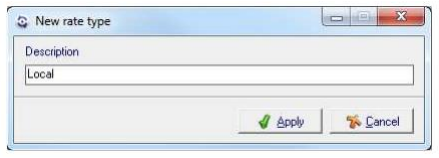
Rate will be created by pressing ‘apply’
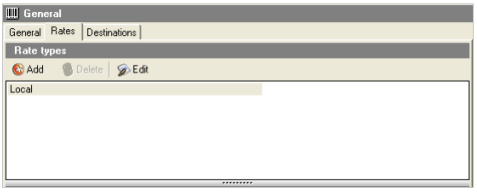
Repeat the same process to create all rates you want, such as:
Once you have created the rate, you can configure the price and application of it. Select
the rate and press the button ‘Edit’ to edit it

By pressing edit, you can modify the following parameters:
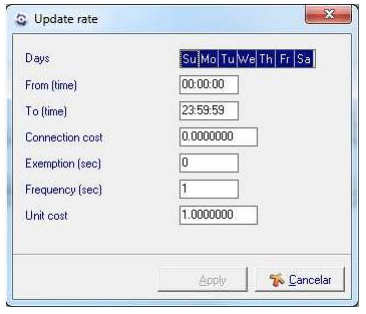
| Days | Selection of days of application of the price |
| From (time) | Application start time |
| To (time) | Final time of application |
| Connection cost | Amount charged for connection |
| Exemption (sec) | Seconds without charge once communication has been established. |
| Frequency (sec) | Charging frequency. Expressed in seconds (value 1′ would attend to 1 second, 60′ to charging per minute). Pricing per second is recommended 1′ to get the exact cost of calls unless the customer expressly wants full minute pricing. |
| Unit cost | Amount of the communication. If the set frequency is 1′, the price of the call to be set is the price in seconds. If the frequency value is 60′, enter the price per minute. |
- Press ‘Apply’ to sabe the changes.
- Repeat process for each rate you want to create
Destinations
III. Tab Destinations
In this section it is possible to create, delete or modify the price of the assigned call for each
destination.
To avoid the loss of information, it is essential that all headers used in the National Numbering
Plan of the country where PMSLINK is installed, are registered in the window ‘Destinations’ with
their corresponding Rate type’ selected:
Adding destinations
- Press ‘Add’ para add a new destination header
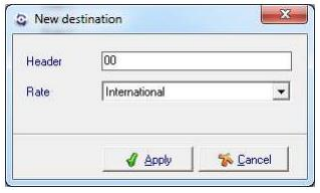
- Header: Enter the phone number header to create.
- Rate: Select the rate applicable to that header.
- Press ‘ Apply’ to save changes
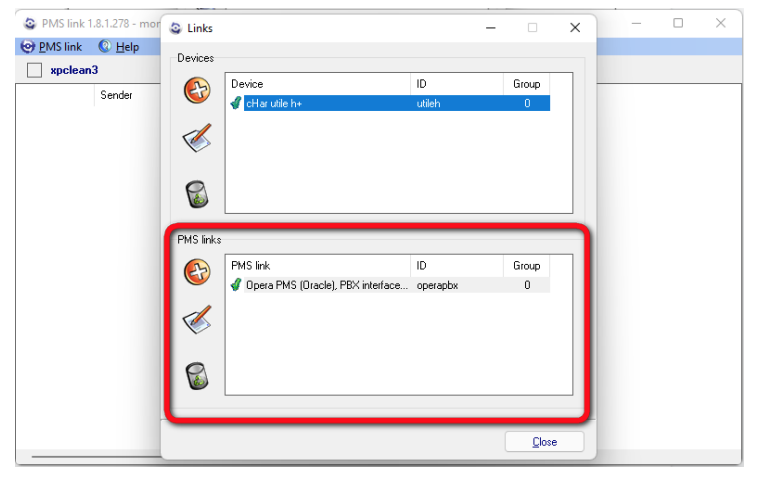
Setting up PMS device
- Start the pmslink Monitor (Menu ‘Start’ of Windows \ ‘All the programs’ \ ‘cHarPMS link’ \ ‘PMS link Monitor’)
- Access menu ‘PMS Link’ \ ‘Link’
- Pressing ‘Add new PMS link’ in the section PMS Links will be offered list of pms
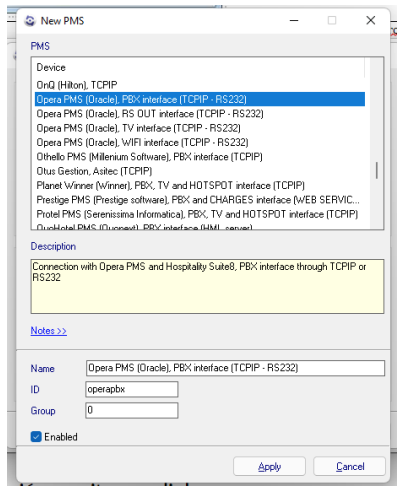
- Locate from the list the PMS to integrate and click on the button ‘ Notes’ to know the details of the integration, as well as the data necessary to connect with the equipment.
- After the notes have been checked, press “Apply” to add it to the configuration
and ‘ Setup PMS link’ to configure the computer parameters.
Because each PMS has its particular options, the following guide will introduce the integration setting with Opera PMS. If your PMS is different from this one and you have doubts, please contact our support to advise you on the setting.
Setting up link with Opera PMS
- Once the PMS has been selected, select the PMS that will now appear in the list of selected PMS and click on the button ‘ Setup PMS Link’.
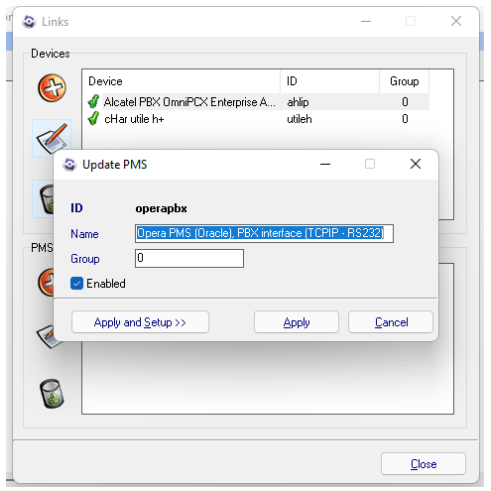
- Press ‘Apply and Setup’ to set the link
- When setting the link, technical notes will be displayed again.
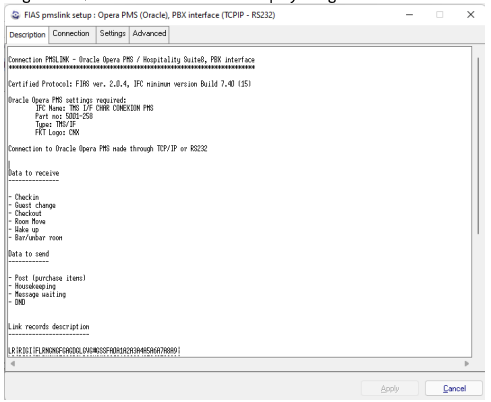
- Please pay attention to these notes, they indicate three essential sections that Opera staff must have configured and provide you with the data to perform the integration, which are:
- IFC correctly deployed: The IFC to be configured by Opera staff is as follows: IFC Name: TMS I/F CHAR CONEXION PMS – Part no: 5001-258 – Type: TMS/IF – FKT Logo: CNX
- IP and port where the opera IFC is deployed
- Tab ‘Connection’. With the confirmed data, go to the Tab Connection’ and complete the data provided by the Opera technician regarding the IP address (Fias server address) and port (Fias server_port) of the IFC FIAS . Other parameters preserve them without modification.
- Tab ‘ Settings’ in case you have to translate the cleanup status value reported from PBX to the expected value by Opera, complete the translation table ‘ Room Status translation’ to perform the cleanup status translations.
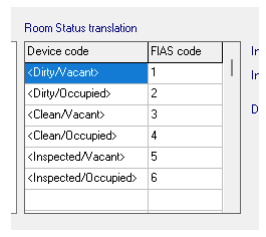
If the cleaning states reported from PBX are the same as those configured in Opera, the
translation of states is not required.
- Press ‘Apply’ to apply the changes and save the PMS settings.
Starting services
- Start the PMSLINK Monitor (Menu ‘Start’ of Windows \ ‘All the programs’ \ ‘cHar PMSlink’ \ ‘PMS link Monitor’
- Select ‘PMS Link’ menu\ Service \Start.
- The pmslink service will be started, activating and initializing the communications links between the PBX and the PMS.
- For following runs, enable automatic start of service.
Checklist and initial checks
- Once the basic setting of the application has been completed and the service has been activated, it is recommended to perform basic operational checks to ensure the correct functioning of the application.
- Check the correct activation of the useful PMS link license.
- Verify that the service is started.
- Verify the communication activity between both systems from the main window.
The basic tests to do are:
- Check the correct configuration of the TSP system by TSP technicians.
- Make a ‘Check-In’ from the PMS system.
- Check in the PBX that the Check-In has been performed correctly and check the messages exchanged between the systems involved in the PMS link monitor window (main screen).
- Make tests with all other actions that were defined in the connection to ensure the correct functioning of all of them (Calls, Check Out, Room Status, Awakening, etc.).
pmslink monitor description

The monitor (main window) will display all communications between the PMS system and the Connected external devices (PBX) in real time.
The following information can be found in the information bar:
Status
Red icon: No communication with the ‘PMS link’ service or the service has not been initiate.
Green icon: There is communication with the service ‘PMS link’ and the service has been initiate.
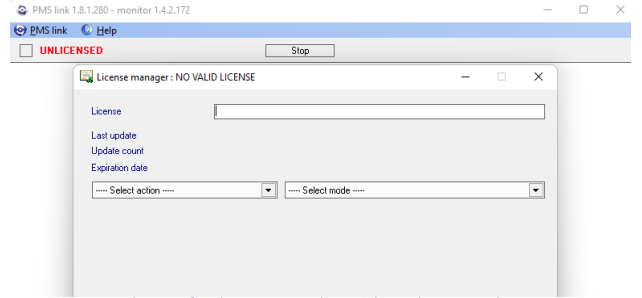
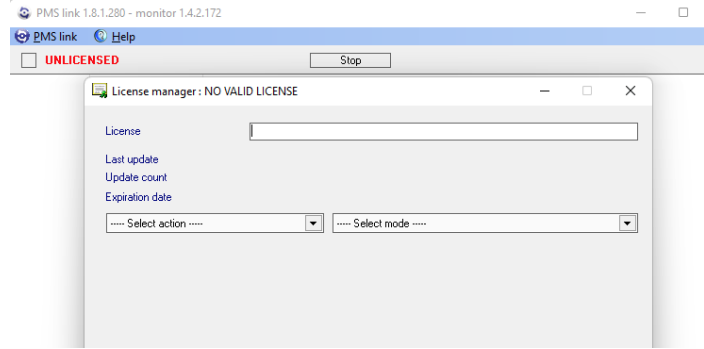
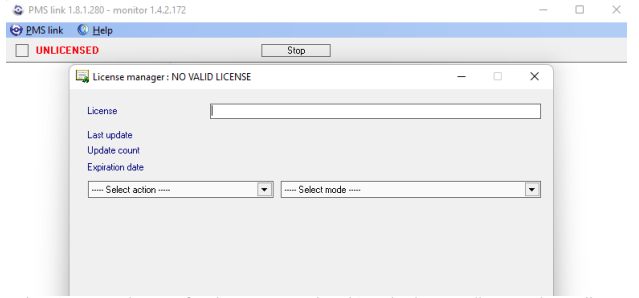
License
UNLICENSED: The application is not licensed. Please contact the application provider
to activate the license.
License number: will show the serial number and in parentheses the number of
devices allowed to be connected.
Pause button
Allows to stop the flow of information displayed in the monitor window, this
action does not stop the service process, actions will continue to run.
When the pause is disabled, a refresh of all pending actions is performed in the
monitor window.
Menu / options
From the menu ‘utile PMS link’ \N allows you to define and configure devices, connections and general application parameters.
Menu: ‘Service’ / ‘Address’
IP address and communication port between the pmslink service and the PMS Link Monitor. It is not recommended to modify these values.
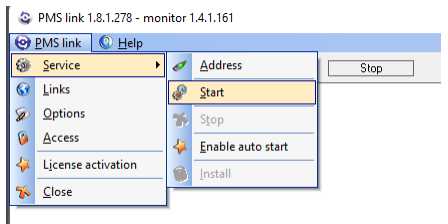
Menu: ‘Service’ / ‘Start’
Start Service. Once the service is started this option is disabled.
Menu: ‘Service’ / ‘Stop’
Service stop. Once the service is stopped this option is disabled.
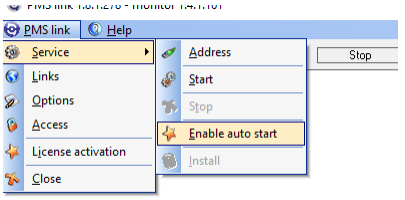
Menu: ‘Service’ / ‘Enable or Disable auto start’
Enable the automatic start of the service.
Menu: ‘Service / Install’
Installing the service on the system. Once the service is installed, this option will be disabled.
Menu: ‘Links’
Configuration screen for external communication devices (PBX, IPTV, WIFI, Domotica, Keycards, etc.) and PMS. Devices to be integrated into the installation.

Devices: The description of this connection type is defined in this guide. See this section for details.
PMS Links: The description of this connection type is defined in this guide. See this section for details.
Menu: ‘Access’
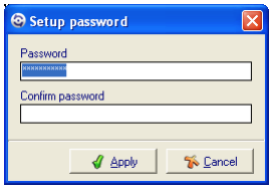
It allows to modify the default password (master) by any other one selected by the user of the application.
The new password must have an exact length of six (6) characters.
The new password must be specified in the “Password” field and must be written back in the “Confirm password” field to verify the correct entry of the new password.
Menu: ‘License activation’
Access to the license management, where you can register, update or uninstall the license thus freeing it from the installation.
You can find more details about license activation in the ‘ Application Setup section, ‘Virtual License Activation’.
Menu: ‘Close’
Close the monitor application. Closing the monitor application does not stop the pmslink service. If you want to stop the service go to Menu: Service’ / Stop’.
Logs de servicio
PMSLINK makes and maintains a detailed record of all activity as well as incidents and actions related to the integration processes with external devices (switchboard, TV systems, Internet, etc.) and the activity of configured PMS devices.
Likewise, a detailed record is also made of incidents, actions and errors that concern the status of communications between each device with which it is connected.
By default, pmslink creates a daily log with service information.
Process activity log files are stored for 30 days in the default folder [..\charwin]\utile\pmslink\trace.
Log files have the following syntax: charpmsyyyymmdd.txt, where:
- charpms: File name.
- aaaa: Year.
- Mm: Month
- Dd: day
Process activity files and specific communications with each external device and/or PMS are stored for 30 days in the folder [..\charwin]\utile\pmslink\link\id_dispositivo\trace.
Log files have the following syntax: Flow_iddispositivo_yyyymmdd.txt, where:
- iddispositivo: ID de dispositivo / PMS link
- aaaa: Year.
- mm: Month
- dd: day
Backup
Directory [..\Charwin] collects all service configurations and binaries. Copying this directory is enough to have a photo of configurations and connections of each IFC configured at the time of copying.
Within the same directory are also the log directories that are those likely to
increase the size of the backup.
These logs are maintained for analysis and traceability of the activity of the same service as well as each of the interfaces. If you want to have as faithful a photo as possible of a production installation without incident where you do not require/want to inherit the logs just do not copy the directories into subfolders called ‘Trace’.
Troubleshooting
| incidence | possible cause | Solution |
| No calls are loaded on the PMS | 1. Not billed phone calls. 2. Failure connection to PBX 3. Failure connection to PMS | Confirm that the pmslink service is started. Review media and infra used in equipment connections: 1. Make test call confirming that there is communication (we pick up the call) for 60 sec and hang up. 2. Check pmslink log and confirm the call log, received phone number and call duration. Confirm application rates. 3. Check the log of the device and confirm that there are no incidents recorded in the connection with the PBX. 4. Check the device log and confirm that there are no recorded incidents in connection with the PMS. |
| Line doesn´t open or the guest name doesn´t update after checkin in the PMS | 1. Connection failure to PBX 2. Connection failure to PMS 3. Wrong parameters sent to PBX | Confirm that the pmslink service is started. Review media and infra used in equipment connections. 1. Check the device log and confirm that there are no incidents registered in the connection with PBX. 2. Check the device log and confirm that there are no recorded incidents in connection with PMS. 3. Review translation of languages and/or COS to be translated between what is reported by the PMS and what is expected by PBX. |
| Monitor failure: UNLICENSED | 1. New installation: user without administrator permissions. 2. New installation: A previous computer change has been made, without license deactivation 3. Installation in production: antivirus intervention on pmslink dlls | 1. Proceed to the installation and registration of license under a system administrator user or otherwise with a user with similar permissions. 2. Return to the original installation, disable the computer’s license ‘old’ install again pmslink on the new computer ‘rescue backup and register the license again. 3. Set the directory as well as all its subdirectories and files to exclude from scanning. Quarantined files, reset to original location. |
| Monitor failure: pmslink : SEND ERROR to. | 1. Connection failure with PBXError in connection to PMS. | Review media and infra used in equipment connections. 1. Check the device log and confirm that there are no incidents registered in the connection with PBX. 2. Check the device log and confirm that there are no incidents registered in the connection with PMS. |


